


Information
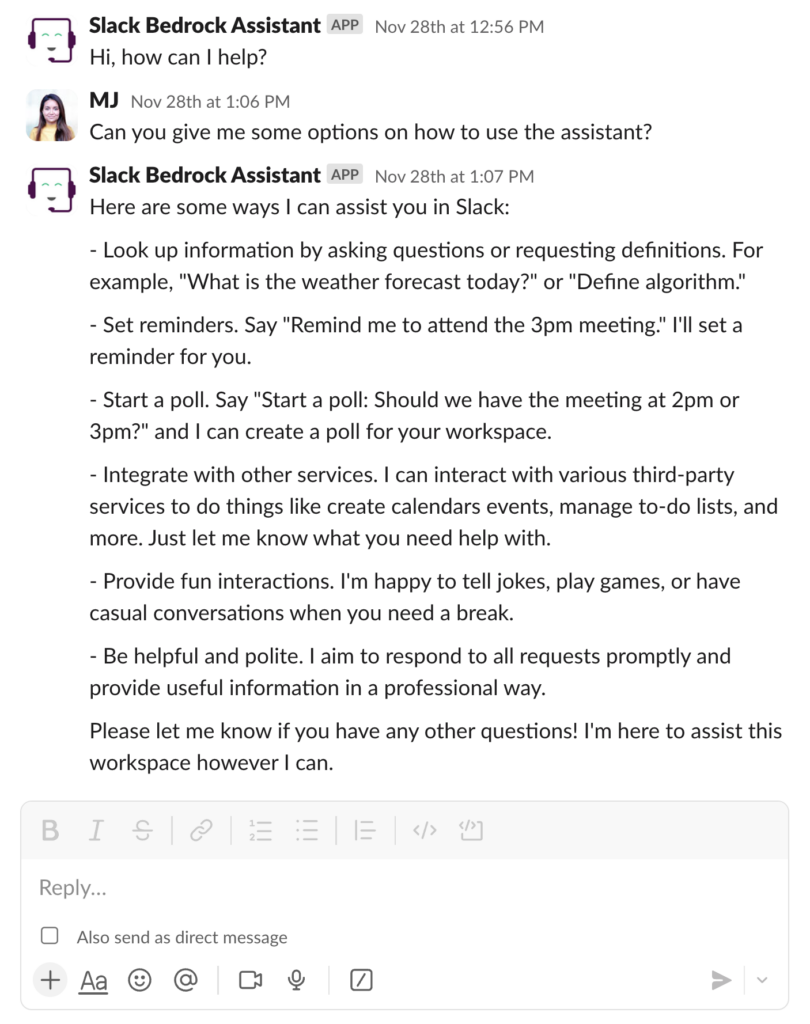
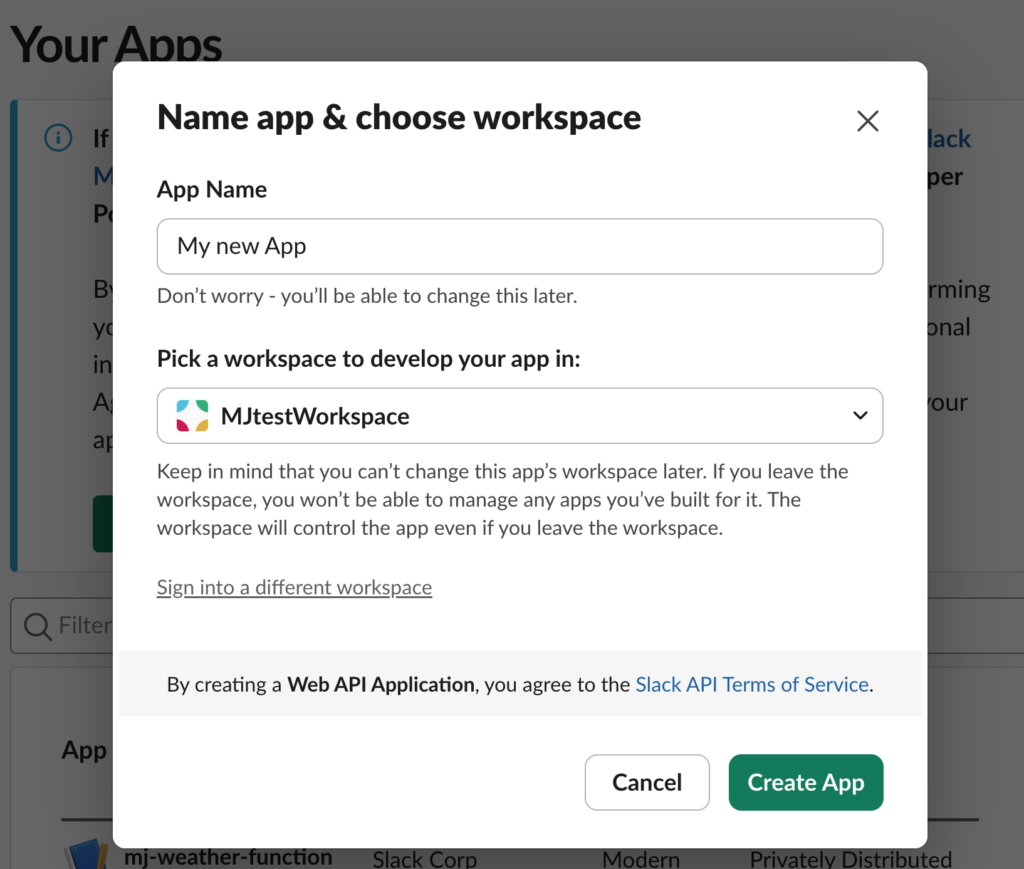
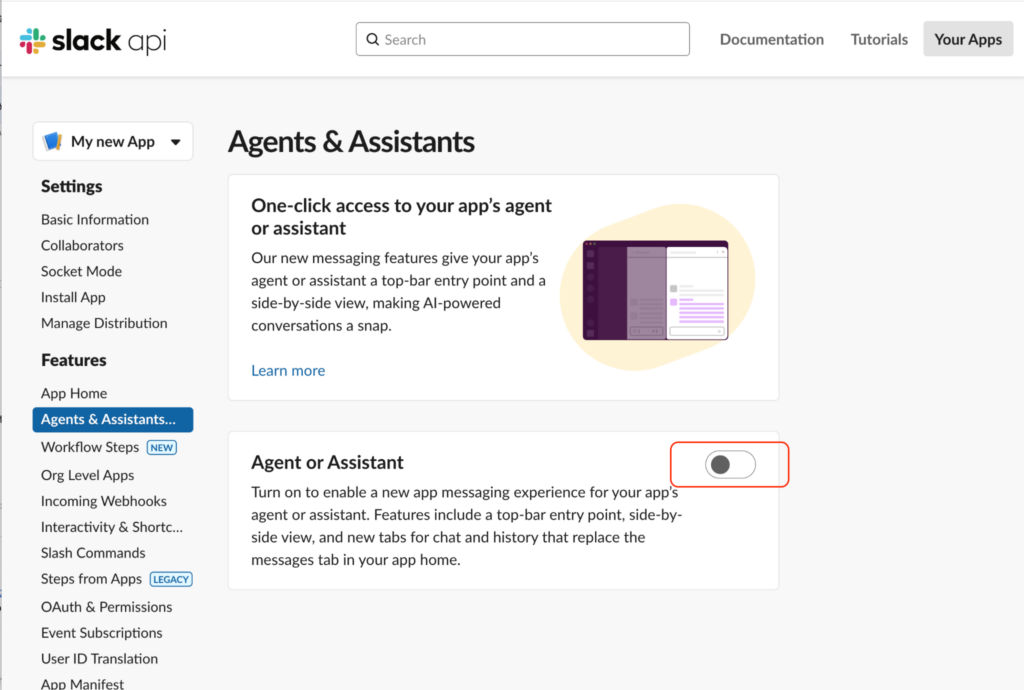
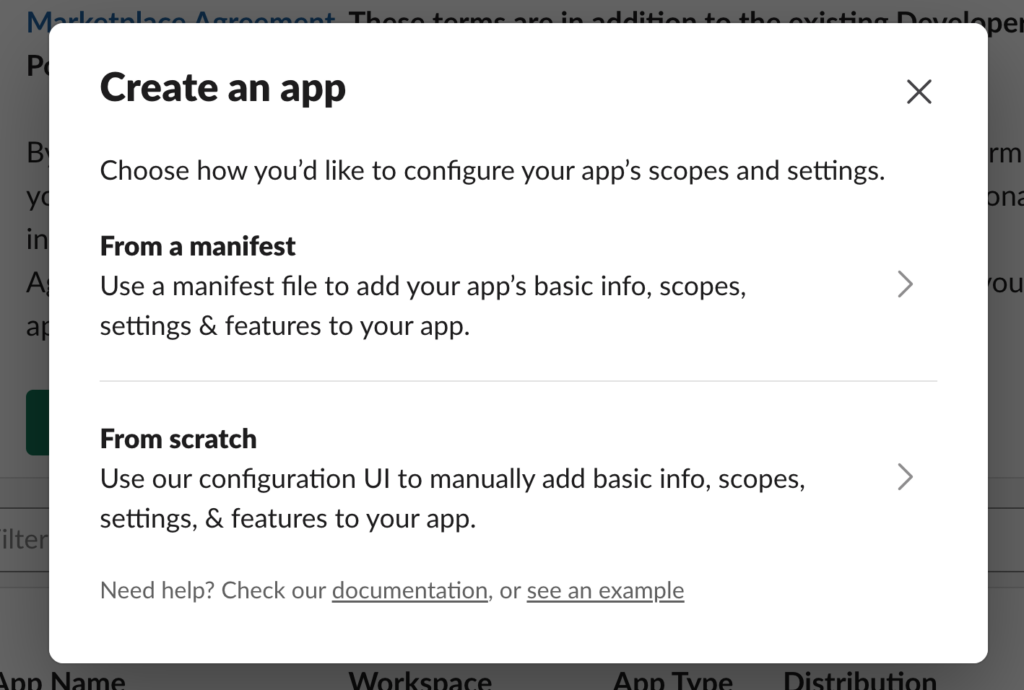
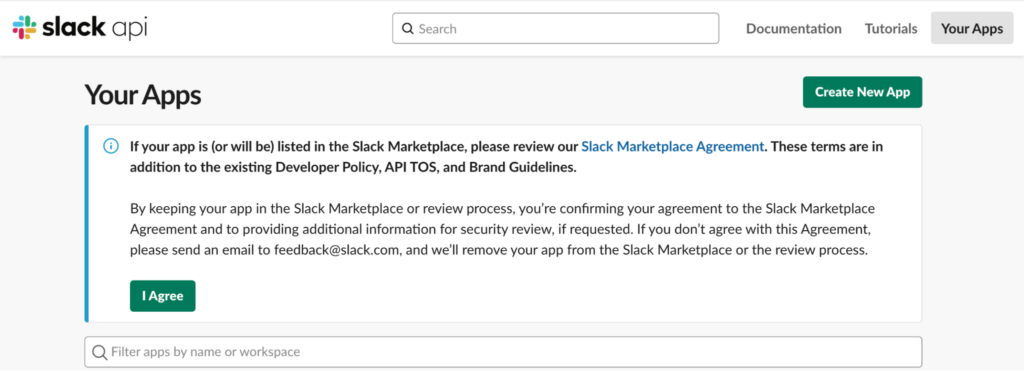
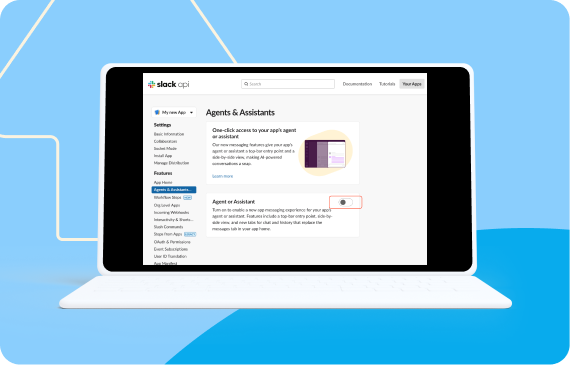
Open main menu < Workshops VSCode A testing workspace (get an Enterprise Grid sandbox for free by joining our developer program ) LLM credentials (OpenAI, Anthropic, AWS Bedrock) Create an AI assistant with your preferred LLM AI is part of our daily lives—whether we’re asking questions, automating tasks, or seeking insights. Why not bring that power directly into your Slack workspace? By integrating your LLM of choice into Slack, you can provide conversational context, eliminate the need to switch between apps, and streamline your workflow. In this workshop, we’ll guide you step by step through building a Slack app that responds to user queries directly within Slack. By the end, you’ll have a fully functional AI assistant that seamlessly integrates into your workspace. You’ll learn how to implement the AI layer using OpenAI, Anthropic, Amazon Bedrock, or Einstein GenAI from Salesforce. With the help of the Bolt.js framework and the new Assistant class, we’ll have your assistant app up and running in no time—all accessible through the Slack interface. Log in to your Slack workspace or join the Developer Program to get a free enterprise sandbox. Create a Slack app . 4. Add a name for your app (you can update it later). 5. Select the workspace where you want to install your app (e.g., the sandbox you created). 6. Click . Navigate to in the sidebar. Enable this feature by toggling it on. Open from the sidebar. The manifest is where your app’s configurations are stored. Learn more in the Slack app manifest API documentation . Ensure your app manifest matches the example below. If it doesn’t, copy and paste the following (replace “My new App” with your app name): { "display_information" : { "name" : "My new App" }, "features" : { "app_home" : { "home_tab_enabled" : false , "messages_tab_enabled" : true , "messages_tab_read_only_enabled" : false }, "bot_user" : { "display_name" : "Bolt for JavaScript Assistant" , "always_online" : false }, "assistant_view" : { "assistant_description" : "An Assistant built with Bolt for JavaScript, at your service!" , "suggested_prompts" : [] } }, "oauth_config" : { "scopes" : { "bot" : [ "assistant:write" , "channels:join" , "im:history" , "channels:history" , "groups:history" , "chat:write" , "canvases:write" , "files:read" ] } }, "settings" : { "event_subscriptions" : { "bot_events" : [ "assistant_thread_context_changed" , "assistant_thread_started" , "message.im" ] }, "interactivity" : { "is_enabled" : false }, "org_deploy_enabled" : false , "socket_mode_enabled" : true , "token_rotation_enabled" : false } } 3. your changes. Open in the sidebar. Scroll to and add the following for our app to work: assistant:write canvases:write channels:history channels:join chat:write files:read groups:history im:history Go to in the sidebar. Scroll down to . Create a token named with the scope . Copy the token for use in Step 6. Now, install your app to your Slack workspace (sandbox). Navigate to in the sidebar. 3. Approve the installation and scopes, and it will generate the for your app to work. 4. Copy the generated bot token for the next step. Now that you’ve completed all the setup, and you’ve gathered all the tokens, you need to connect your app to the configuration you set up earlier. Clone this repository to your local machine, and open it with your favorite code editor. Locate the .env.sample file, make a copy, and rename it . Add your and from Steps 4 and 5. Add credentials for your LLM of choice: Get credentials here . Go to in your AWS Console. Thanks to the Assistant template, most of your app is already set up and ready to use. In this section, we’ll explore each part in more detail. The only significant variations will come from the specific LLM implementation you choose. Feel free to skip steps 8–10 if you’re already familiar with them. First, you need to initialize your Bolt app. This step is standard for all apps built using the Slack Bolt framework. During initialization, you’ll add the bot token, the app token, enable socket mode (if needed), and configure debugging mode: /** Initialization */ const app = new App ({ token: process . env . SLACK_BOT_TOKEN , appToken: process . env . SLACK_APP_TOKEN , socketMode: true , logLevel: LogLevel . DEBUG , }); Next, add the LLM initialization. Refer to steps 8–10 for guidance, depending on the LLM you choose. Here’s where the real magic happens: the new Assistant class streamlines handling incoming events when users interact with your assistant app. It includes several key methods: Handles assistant_thread_started events, triggered when a user starts a conversation or thread. You can customize this method with prompts to guide users as they begin the conversation. Tracks the context of the conversation as the user navigates through Slack by listening to assistant_thread_context_changed events. Manages incoming message.im events. You can create scenarios within this method to help your assistant handle various cases. The template already includes basic implementations for these methods, but you can modify and extend them to support new scenarios tailored to your use case. Integrating OpenAI into your app is simple. Begin by adding the credentials you obtained in Step 6 to your file under the key . The template already includes support for this LLM, so no additional setup is required—just ensure your API key is correctly added. The expected implementation for OpenAI is as follows: /** OpenAI Setup */ const openai = new OpenAI({ apiKey: process.env.OPENAI_API_KEY, }); That’s it! Your app is now ready to interact with OpenAI’s powerful LLM. To integrate Anthropic into your app, begin by adding your API key to the .env file as follows: ANTHROPIC_API_KEY= In your app.js, replace the openAI implementation with the following setup: const anthropic = new Anthropic({ apiKey: env.ANTHROPIC_API_KEY, }); const completion = await anthropic.completions.create({ model: "claude-2", max_tokens_to_sample: 300, prompt: `${Anthropic.HUMAN_PROMPT} . Do not add tags, comment on your response or mention the number of words.${Anthropic.AI_PROMPT}`, }); const completionContent = completion.completion; This configuration ensures your app is ready to generate completions using Anthropic’s Claude-2 model. You can customize the prompt dynamically based on your use case. To use AWS Bedrock, start by adding the required keys and values to your .env file: =ADD-YOUR-KEY-HERE =ADD-YOUR-SECRET-HERE =eu-central-1 Next, implement the Bedrock configuration in your app.js: /** AWS Bedrock Setup */ const bedrockClient = new BedrockRuntimeClient ({ region: process . env . AWS_REGION || "us-east-1" , credentials: { accessKeyId: process . env . AWS_ACCESS_KEY_ID , secretAccessKey: process . env . AWS_SECRET_ACCESS_KEY , }, }); /** Helper function to call Bedrock */ const modelId = "anthropic.claude-v2" ; // Specify your model ID const callBedrock = async ( prompt ) => { const request = { prompt: ` \n\n Human: ${ prompt } \n\n Assistant:` , max_tokens_to_sample: 2000 , }; const input = { body: JSON . stringify ( request ), contentType: "application/json" , accept: "application/json" , modelId: modelId , }; const command = new InvokeModelCommand ( input ); const response = await bedrockClient . send ( command ); const completionData = JSON . parse ( Buffer . from ( response . body ). toString ( 'utf8' )); return completionData . completion . trim (); }; This setup enables your app to interact with AWS Bedrock using the specified model ID. The helper function callBedrock accepts a prompt , sends a request to Bedrock, and returns a processed response, ready to be used in your application. You can now use the callBedrock function within the userMessage method of the Assistant class to replace the part where the LLM is called. Here’s an example implementation: // Build conversation history for Bedrock const userMessage = { role: “user”, content: message.text }; const threadHistory = thread.messages.map((m) => { const role = m.bot_id ? “assistant” : “user”; return { role, content: m.text }; }); const messages = [ { role: “system”, content: DEFAULT_SYSTEM_CONTENT }, …threadHistory, userMessage, ]; // Build Bedrock prompt const bedrockPrompt = messages .map((m) => `${m.role === “system” ? “” : m.role === “user” ? “Human” : “Assistant”}: ${m.content}` ) .join(“\n\n”); // Call Bedrock for response const bedrockResponse = await callBedrock(bedrockPrompt); This example builds a conversation history, formats it into a Bedrock-compatible prompt, and sends it to AWS Bedrock for processing. The response is then ready to be used in your Slack assistant app. To start your app, open your terminal and run the following command: . Your app is now up and running! You can begin interacting with it directly in your Slack workspace. : If you run into any issues with your app, check out our developer forums for guidance and support. If you want to try this app: Follow the configuration steps (1–5). Obtain your OpenAI API keys (6). Clone the repository mentioned in Step 6 by running the following command in your terminal: git clone https://github.com/slack-samples/bolt-js-assistant-template.git Complete the setup and start your app by following Step 11. Build Get Started Tools Learn Overview Resources Get Started Tools Overview Resources Building AI Apps in Slack with Bolt JS Like talking to your work bestie, 24/7 Difficulty Intermediate Time 35 minutes Requirements Quick Jump AI is part of our daily lives—whether we’re asking questions, automating tasks, or seeking insights. Why not bring that power directly into your Slack workspace? By integrating your LLM of choice into Slack, you can provide conversational context, eliminate the need to switch between apps, and streamline your workflow. In this workshop, we’ll guide you step by step through building a Slack app that responds to user queries directly within Slack. By the end, you’ll have a fully functional AI assistant that seamlessly integrates into your workspace. You’ll learn how to implement the AI layer using OpenAI, Anthropic, Amazon Bedrock, or Einstein GenAI from Salesforce. With the help of the Bolt.js framework and the new Assistant class, we’ll have your assistant app up and running in no time—all accessible through the Slack interface. Step 1 Configure your Slack app 4. Add a name for your app (you can update it later). 5. Select the workspace where you want to install your app (e.g., the sandbox you created). 6. Click Create App. Collapse Step 2 Enable assistant access on the top bar in Slack Collapse Step 3 Complete your app manifest Collapse Step 4 Add scopes and retrieve tokens Collapse Step 5 Install your app Now, install your app to your Slack workspace (sandbox). 3. Approve the installation and scopes, and it will generate the Bot token for your app to work. 4. Copy the generated bot token for the next step. Collapse Step 6 Let’s start coding! Now that you’ve completed all the setup, and you’ve gathered all the tokens, you need to connect your app to the configuration you set up earlier. Collapse Step 7 Deep dive into app.js Thanks to the Assistant template, most of your app is already set up and ready to use. In this section, we’ll explore each part in more detail. The only significant variations will come from the specific LLM implementation you choose. Feel free to skip steps 8–10 if you’re already familiar with them. First, you need to initialize your Bolt app. This step is standard for all apps built using the Slack Bolt framework. During initialization, you’ll add the bot token, the app token, enable socket mode (if needed), and configure debugging mode: Next, add the LLM initialization. Refer to steps 8–10 for guidance, depending on the LLM you choose. Here’s where the real magic happens: the new Assistant class streamlines handling incoming events when users interact with your assistant app. It includes several key methods: threadStarted: Handles assistant_thread_started events, triggered when a user starts a conversation or thread. You can customize this method with prompts to guide users as they begin the conversation. threadContextChanged: Tracks the context of the conversation as the user navigates through Slack by listening to assistant_thread_context_changed events. userMessage: Manages incoming message.im events. You can create scenarios within this method to help your assistant handle various cases. The template already includes basic implementations for these methods, but you can modify and extend them to support new scenarios tailored to your use case. Collapse Step 8 Using OpenAI Integrating OpenAI into your app is simple. Begin by adding the credentials you obtained in Step 6 to your .env file under the key OPENAI_API_KEY. The template already includes support for this LLM, so no additional setup is required—just ensure your API key is correctly added. The expected implementation for OpenAI is as follows: That’s it! Your app is now ready to interact with OpenAI’s powerful LLM. Collapse Step 9 Using Anthropic To integrate Anthropic into your app, begin by adding your API key to the .env file as follows: ANTHROPIC_API_KEY= In your app.js, replace the openAI implementation with the following setup: This configuration ensures your app is ready to generate completions using Anthropic’s Claude-2 model. You can customize the prompt dynamically based on your use case. Advanced: You’ll need to replace the calls to openAI with new ones for Anthropic under the userMessage method. See the implementations for openAI (template), and Bedrock (step 10) for inspiration. Collapse Step 10 Using Bedrock To use AWS Bedrock, start by adding the required keys and values to your .env file: Next, implement the Bedrock configuration in your app.js: This setup enables your app to interact with AWS Bedrock using the specified model ID. The helper function callBedrock accepts a prompt, sends a request to Bedrock, and returns a processed response, ready to be used in your application. You can now use the callBedrock function within the userMessage method of the Assistant class to replace the part where the LLM is called. Here’s an example implementation: // Build conversation history for Bedrock const userMessage = { role: “user”, content: message.text }; const threadHistory = thread.messages.map((m) => { const role = m.bot_id ? “assistant” : “user”; return { role, content: m.text }; }); const messages = [ { role: “system”, content: DEFAULT_SYSTEM_CONTENT }, …threadHistory, userMessage, ]; // Build Bedrock prompt const bedrockPrompt = messages .map((m) => `${m.role === “system” ? “” : m.role === “user” ? “Human” : “Assistant”}: ${m.content}` ) .join(“\n\n”); // Call Bedrock for response const bedrockResponse = await callBedrock(bedrockPrompt); This example builds a conversation history, formats it into a Bedrock-compatible prompt, and sends it to AWS Bedrock for processing. The response is then ready to be used in your Slack assistant app. Collapse Step 11 Run your Bolt app To start your app, open your terminal and run the following command: npm start. Your app is now up and running! You can begin interacting with it directly in your Slack workspace. Collapse Step 12 Troubleshooting your app Developers: If you run into any issues with your app, check out our developer forums for guidance and support. Admins: If you want to try this app: Collapse Subscribe to our developer newsletter © 2025 Slack Technologies, LLC, a Salesforce company. All rights reserved. Various trademarks held by their respective owners.